BATHROOM TILER DERBY
BATHROOM & WET ROOM TILING, UNDERFLOOR HEATING & SHOWER BOARD INSTALLATION ACROSS DERBYSHIRE
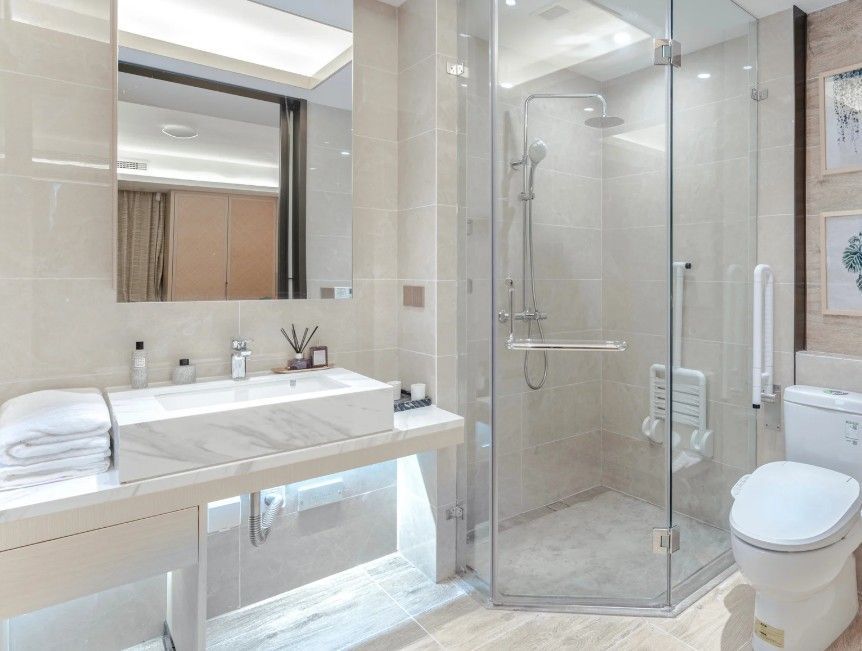
BATHROOM TILING
At Derbyshire Tiling Specialists we appreciate that bathroom tiling is not just about aesthetics; it plays a crucial role in maintaining hygiene and durability in one of the most used spaces in a home. Getting this room right, will create a room with an atmosphere of tranquillity and help create a sanctuary of relaxation. Whether you’re renovating an existing bathroom or designing a new one, choosing the right materials, tile configurations, and layout is essential for achieving a stylish and practical finish.
Our experienced tilers can help you select the best tiles for bathrooms, explain the role of tile backer boards, and what you should consider for bathroom floor tiles, wall tiles or whether to consider other options.
BATHROOM TILER NEAR ME
If you live in Derby or further afield in Derbyshire and are looking for a bathroom tiler near me, we're ideal - get in touch today
BATHROOM FLOOR TILING DERBY
Best Tiles for Bathrooms
When it comes to choosing the best tiles for bathrooms, several factors need to be taken into account: slip resistance, water absorption, maintenance, and style. Here's a breakdown of popular tile options:
- Ceramic Tiles: These are among the most common choices for bathroom floors and walls due to their moisture resistance, affordability, and ease of installation. Ceramic tiles come in various sizes, colours, and designs, allowing for versatility in style.
- Porcelain Tiles: More durable and less porous than ceramic, porcelain tiles are an excellent choice for bathrooms. They resist water and stains and can mimic the look of natural stone with added durability.
- Natural Stone: Options such as marble, granite, and slate confer luxury and elegance. However, they require more maintenance due to their porosity, and sealing is often recommended to prevent water damage and staining.
- Glass Tiles: Often used as accents or for backsplashes, glass tiles can create a visually appealing effect with their reflective qualities. They are, however, more challenging to install due to their fragility and can be slippery so pro.
- Vinyl Tiles: Nowadays, luxury vinyl tile (LVT) is gaining popularity for its water resistance, comfort, and ease of maintenance. Many are designed to mimic wood or stone while offering warmer option underfoot than a ceramic or porcelain tile.
Considerations for Bathroom Floor Tiles
When selecting floor tiles for a bathroom, several factors come into play:
- Slip Resistance: Safety is paramount in a bathroom due to the potential for slips and falls. Look for tiles with a high coefficient of friction—often marked as R10 or higher—which indicate slip resistance.
- Durability: The bathroom floor undergoes high traffic, so durable materials like porcelain or ceramic tiles should be prioritized. Choose tiles with a PEI (Porcelain Enamel Institute) rating suitable for residential areas.
- Water Absorption Rate: Opt for tiles with low water absorption rates. This characteristic is especially important in bathrooms where moisture content is high.
- Maintenance: Tiles with minimal grout lines can reduce cleaning efforts, as narrow joints are less likely to trap dirt and grime. An easy-to-clean surface also enhances longevity.
- Style and Size: Large format tiles can create a sense of space in small bathrooms while smaller tiles may create intricate patterns. The choice of colour and texture also impacts the overall design language of the bathroom
SHOWER TILER NEAR ME
If you live in Derby or further afield in Derbyshire and are looking for a shower tiler near me, we're ideal - get in touch today
BATHROOM WALL TILER DERBY
Tile Backer Boards vs. Plasterboard Walls
When installing wall tiles, particularly in wet areas, the type of backing material used is crucial for ensuring longevity and preventing moisture damage. There are several different schools of thought regarding the best and most cost effective backing for tiling a bathroom:
Tile Backer Boards: These are specifically designed for wet areas like bathrooms and showers. Made from cement-based materials or foam, they provide excellent moisture resistance. They are denser than traditional plasterboard, making them a more robust choice for tile installation. Using a backer board offers better adhesion for tiles, reducing the risk of moisture penetrating behind the tiles and causing mold or damp issues.
Plasterboard Walls: While standard plasterboard can be used in dry areas, it’s not recommended in wet zones as it can soak up moisture, leading to deterioration and compromised structural integrity. If tiles are applied to plasterboard in wet areas, it's advisable to use moisture-resistant plasterboard, but tile backer boards are preferable for tiling surfaces exposed to water.
In reality properly install tiles and grout will provide a watertight barrier so many people will say that the additional expense of suing tilebacker boards is over specification and this has truth in it. If your bathroom refit is one you hope will last for many years but it also used a lot and may be subjected to the odd knock or bang, which could damage or loosen a tile or grout then a tile backer board would be justified.
Wall Tiles: From Floor to Ceiling or Not?
Deciding whether to tile walls from floor to ceiling depends on your bathroom’s design aesthetic, size, and functionality.
Floor-to-Ceiling Tiling: This approach can create a seamless, elegant look, especially in smaller bathrooms where maximising space is vital. It also minimises the risk of mould and moisture damage since the entire wall is protected. A consistent tile look can provide a spa-like ambience and can be particularly beneficial in wet areas, such as shower enclosures.
Partial Tiling: Opting for half or lower wall tiling can save costs and allow for creative alternatives in non-wet areas of the wall, like paint or wallpaper. This approach permits flexibility in design, enabling you to pick various colours and texture combinations.
Ultimately, the decision to tile up to the ceiling often depends on the desired look and the functionality required in the space.


SHOWER PANELS DERBY
The Popularity of Shower Boards
In the UK, there has been a noticeable shift toward using shower boards, particularly due to their practicality and aesthetic appeal. Shower boards, also known as wall panels or cladding, and they are gaining popularity as a modern alternative to traditional tiling due to several reasons:
- Ease of Installation: Shower boards are typically easier and quicker to install compared to tiles. They can be mounted directly onto existing surfaces, reducing the need for extensive preparation or removal work, especially if the existing wall is flat
- Seamless Appearance: These boards often come in large panels, resulting in fewer visible joints, which not only adds to their sleek and contemporary appearance but also reduces potential areas for mould and mildew growth.
- Waterproof and Durable: Most shower boards are made from materials like PVC or acrylic, providing full waterproofing and resistance to water damage. This makes them particularly suitable for bathrooms that are subject to high moisture levels.
- Low Maintenance: Unlike traditional tiles that may require regular scrubbing and grout maintenance, shower boards typically only need a quick wipe-down to remain spotless. Their smooth surfaces do not trap dirt and are resistant to stains and discolouration.
- Wide Variety of Designs: Wide Range of Designs: Shower boards come in an extensive assortment of styles and finishes to suit any taste. Homeowners can choose from options such as realistic stone, warm wood, and sleek high-gloss effects. This variety allows you to customize your bathroom according to your personal aesthetic preferences.
SHOWER PANEL INSTALLERS
If you live in or around Derby and are looking for an experience shower panel installer then get in touch with us today to arrange a quote
BATHROOM FITTERS DERBY
Whilst tiling can be seen as putting the finishing touches to a bathroom renovation as part of Derbyshire Specialists Group we can put a team together the completely transform your bathroom. Our plumbers can install all your sanitaryware, our joiners can fit cupboards and storage units, our electrician can transform the lighting in your bathroom and install electric underfloor heating, while our flooring specialist can work in conjunction with the tiler to level floors and put in appropriate drainage slopes if you intend to have a tiled floor wet room area.
So if you were initially just looking for a bathroom tiler and found us then don't hesitate to ask us to quote for every aspect of your bathroom renovation - we can even provide finance options too which can help you avoid too many compromises if working to a tight budget.
Don't delay, simply get in touch with us today to get the bathroom of your dreams.
Bathroom Tiling

Installation of Bathroom Floor Tiles
When installing new kitchen flooring there will often be a large job in the removal of the existing flooring and getting the floor properly prepared for new floor tiles.
It is really important that the subfloor is flat and stable as this will prevent future grout or tile cracks.
Depending on whether your new floor is part of a full kitchen renovation ideally you would want to flor tile from wall to wall. Whilst this will also involved tiling under cabinate and other fixtures this way they will all be on the same level and ensure that if you replace any items in the furure that there will be no gaps.
Whilst only tiling to the line of your cabinets will save you the costs of extra m2 of tiling we would only suggest this if you are on a very tight budget.
Depending on the stat of the sub floor we may have to overlay additional boards or apply screed which will be dependent and the existing sub-base.
Once this is in place we will prime the floor to improve adhesion.
Before laying any tiles we will establish a start position which will often be the doorway or the central focus point of the floor. From that point we will mark a grid on the floor to have reference points for laying.
If you have a mix of tiles of patterned sections we may dry lay these down so you can visualise them in place ensuring you know we know exactly how you want them laid in your kitchen.
We can then set about getting the adhesive mixed and trowelled down onto the floor. If you have selected large or very large floor tiles some adhesive may also be applied to the back of the tile.
We will then lay the tiles ensuring flatness with a spirit level and that there are no raised edges (lippage) from one tile to the next.
The floor tiles should not be walked on for at least 24 hours to ensure proper curing. Only then will we mix and apply flexible floor grout. After another 24 hours we will clean off any grout haze and then carry out a final clean. If you have natural tiles or cement grout we will also apply a floor tile seal before finally applying a flexible sealant around the perimeter of the tiles floor.

Fitting Bathroom Wall Tiles
The main steps for wall tiling are fairly similar to bathroom floor tiling where good preparation is key. The one aspect which may alter how we approach things is whether it is part of other changes to your bathroom such as the installation of new cupboards or sink units or repositioning of sanitary ware.
In bathroom unlike kitchens wall tiles should be installed the until should be installed first so that the cupboards and shower units are installed onto the tiles maintaining a watertight finish with small amounts of selant used around holes in the tiles. Pilot holes before drilling mitigates tiles cracking.
For the area to be tiles we will make sure the walls are clean, dry, and free of grease, dust, or peeling paint. We may reboard with a moisture resitance drywall or use a tilebacker board, as tile adhesive can only hide minor imperfections.
We will then apply a tile primer to seal the surface and improve the adhesion of the tiles.
Before fitting any bathroom tiles we will mark out the wall and and establish centre point which will help us determine a suitable start point, generally from the bottom up. We want to avoid having to use excessive grout as an edge filler, or using just as small length of tile which just wouldn't look neat and tidy.
We will then mix and apply the adhesive at about 1m2 at a time to prevent the adhesive going off too soon.
We will then add the tiles checking with a plumbline for horizontal positioning and leaving a grout gap between tiles with the appropriately sized spacers.
We will cut the tiles that shaping or resizing to provide a neat finish against all edges.
When all tiles are in place and have had a chance to set we will mix and then apply the grout, sponging away any excess grout from the tiles. Depending on the grout used we may also apply a grout sealer befor caulking along any edges that may be prone to slight movements such as bathtubs

Fitting Shower boards
Since shower boards need to beslotted together they need to be fitted to a flat even surface. We would normally remove existing surfaces to achieve the best results. This means removing old tiles or wall coverings to expose a clean, stable wall (e.g., plasterboard, plywood, or concrete). Some ahower panels can sometimes be installed over existing tiles, but only if the tiles are completely clean, secure, and flat. We apply a waterprrof membrane about 3 foot up the walls to provide waterproof 'tanking'.
Before applying any adhesives we Dry Fit and Measure the shower area precisely so we can determine where the panel joints will fall to ensure symmetry. It's best to use full panels in the most visible areas.
Only then woule we cut the panels to size using a circular saw, jigsaw, or track saw fitted with a fine-tooth blade (e.g., a reverse-tooth laminate blade) to cut the panels cleanly.
We always cut from the front to avoid chipping the decorative face. When using a scoring knife we always cut the panels face-up, but face-down when using a circular saw.
We measure and cut holes for shower valves, pipework, and fixtures slightly larger than the pipe to allow for the application of sealant behind the trim pieces later.
We then fix the panels to the wall using adhesive and sealant as recommended by the particular panel manufacturer (often a specialised solvent-free grab adhesive). This is normally applied it in a vertical serpentine pattern or in vertical beads (approx. 6 inches apart) on the back of the panel. We avoid putting adhesive too close to the edge to prevent squeeze-out.
We then apply sealant to edges (critical) where panels will meet each other or where they meet a tray/wall. A continuous bead of 100% silicone sealant (specifically wet-area sanitary silicone) directly onto the panel before fixing. This provides the primary waterproof seal.
We then fit the first panel starting in a corner, by applying firm pressure across the entire panel to ensure the adhesive spreads evenly.
The remaining panels are then fitted. For tongue-and-groove or Hydrolock panels, we slide the next panel firmly into the grooved edge of the preceding panel, ensuring the applied sealant creates a perfect, watertight compression joint, wiping away any immediate sealant squeeze-out.
Once the panels are in place we fit the tims and seal all the joints. For internal corner joints where panels meet, we use a corner trim, or if you prefer a seamless look, use a neat bead of silicone sealant (color-matched to the panel or chosen aesthetic) directly in the corner gap.
Finally we sealing around fixtures such as pipe cut outs before fitting the cosmetic collar or escutcheon plate and apply a final, continuous, smooth bead of 100% silicone sealant where the bottom of the panel meets the shower tray or bathtub creating a moisture barrier.
It is importantly, all sanitary silicone seals are allowed to cure completely, usually 24 to 48 hours before exposing the shower to water.